 THE GLOWNIQUE
Why Is My Neon Sign Flickering? How to Diagnose Drivers, Dimmers & Wiring
A flickering LED neon sign is caused by a failing 12V power supply in roughly 70% of cases, followed by a loose DC barrel connector, a failing inline PWM dimmer, or an overloaded circuit. For traditional glass neon, flickering stems from a dying high-voltage transformer, arcing GTO wiring, or depleted neon gas. Isolating the fault takes five minutes using a direct power bypass test.

Key takeaways
- Test the power adapter first by unplugging inline dimmers and remote receivers to connect the power supply directly to the sign's DC input jack.
- If the sign strobes or shuts down after 2 to 5 minutes of operation, the power adapter is overheating or undersized and tripping its internal thermal cut-off.
- Flickering that only appears on smartphone video or camera screens is caused by low-frequency PWM dimming conflicting with camera shutter speeds, not a hardware fault.
- Traditional glass neon signs operate at 2,000 to 15,000 volts; loud buzzing or visible sparks indicate high-voltage transformer arcing that requires certified electrical service.
- When replacing a power supply, always match the exact output voltage (12V or 24V DC) and provide at least 20% wattage headroom above the sign's total draw.
A flickering LED neon sign is caused by a failing 12V/24V power adapter in approximately 70% of cases, followed by a loose 5.5×2.1mm DC barrel connector, a failing inline PWM dimmer, or an overloaded household circuit. For traditional glass neon, flickering stems from a dying high-voltage transformer, arcing GTO wiring, or depleted neon gas. Isolating whether the flicker originates in the adapter, the dimmer, or the silicone flex takes five minutes with a simple direct bypass test.
Few things are more frustrating than switching on your illuminated sign only to be greeted by an erratic blink, a rapid strobe, or a distracting rhythmic flicker. Whether you are running a restaurant dining room, decorating a boutique salon, setting up a wedding photo backdrop, or relaxing in your home lounge, a flickering sign disrupts the ambiance and raises immediate concerns about electrical safety.
Most online advice either treats all signs as vintage 15,000-volt glass tubes or suggests vague tips like "plug it into another wall." In this definitive workshop guide, we provide a structured, step-by-step diagnostic roadmap based on first-principles electrical engineering. We will help you isolate the root cause within five minutes, restore solid illumination, and understand when a simple adapter swap fixes the issue versus when internal wiring requires repair.
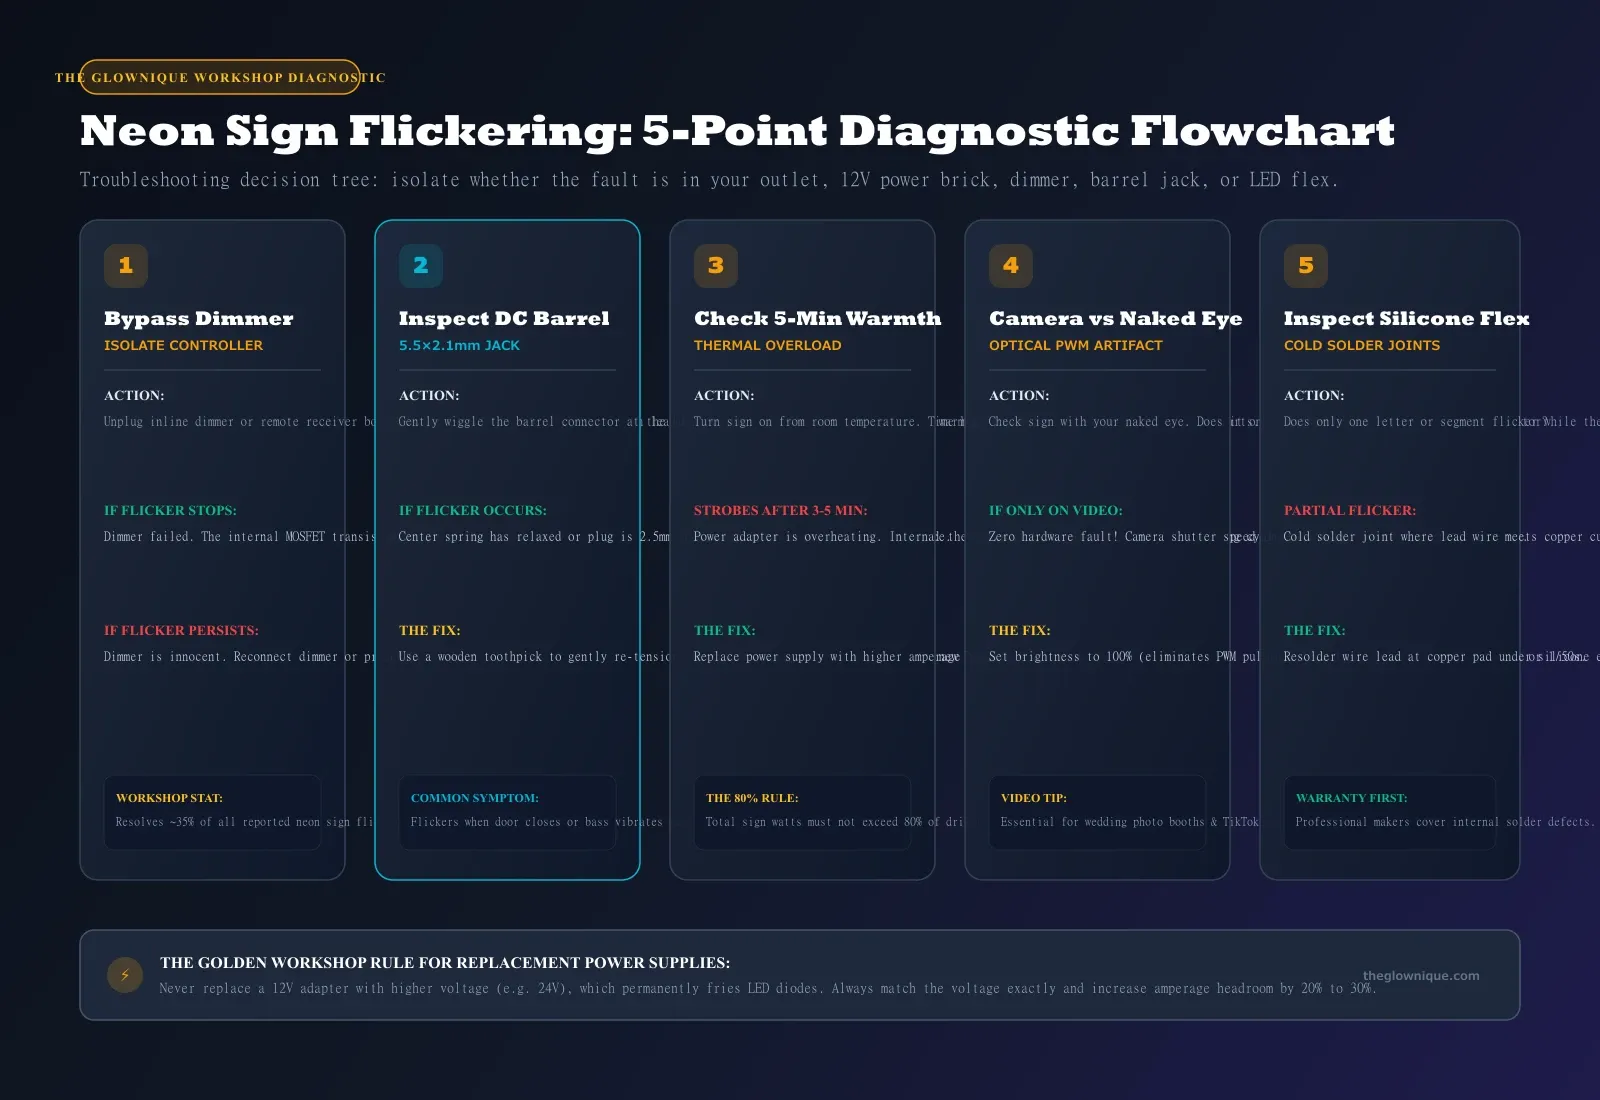
Glass neon vs LED neon: which sign do you have?
Before touching any wires, you must identify your sign's technology. Traditional glass neon and modern LED neon operate on completely different electrical principles:
- Modern LED Neon Flex Signs: Fabricated from flexible, optical-grade silicone or PVC tubing housing miniature SMD LED chips mounted on an acrylic backboard. These run on safe, low-voltage direct current (12V or 24V DC) supplied by a desktop power brick or plug-in transformer. If your sign was manufactured in the last ten years, is mounted on clear acrylic, feels cool or barely warm to the touch, and plugs into a small black power adapter, it is an LED neon sign. Browse our workshop's custom LED neon signs to see modern low-voltage silicone construction.
- Traditional Glass Neon Signs: Handcrafted from sealed, gas-filled glass tubes containing inert neon or argon gas. They require high-voltage alternating current (typically 2,000 to 15,000 volts AC) generated by a heavy magnetic iron-core or electronic solid-state transformer. Glass tubes are rigid, fragile, and feature exposed glass electrodes sealed in rubber boots at the tube ends.
Safety note: 12V LED neon signs operate within Safety Extra-Low Voltage (SELV) limits, making them completely safe for DIY diagnostic checks. Conversely, traditional glass neon carries lethal voltages. If you own an authentic glass neon sign that is buzzing loudly, smoking, or sparking, unplug it immediately and consult a licensed sign technician.
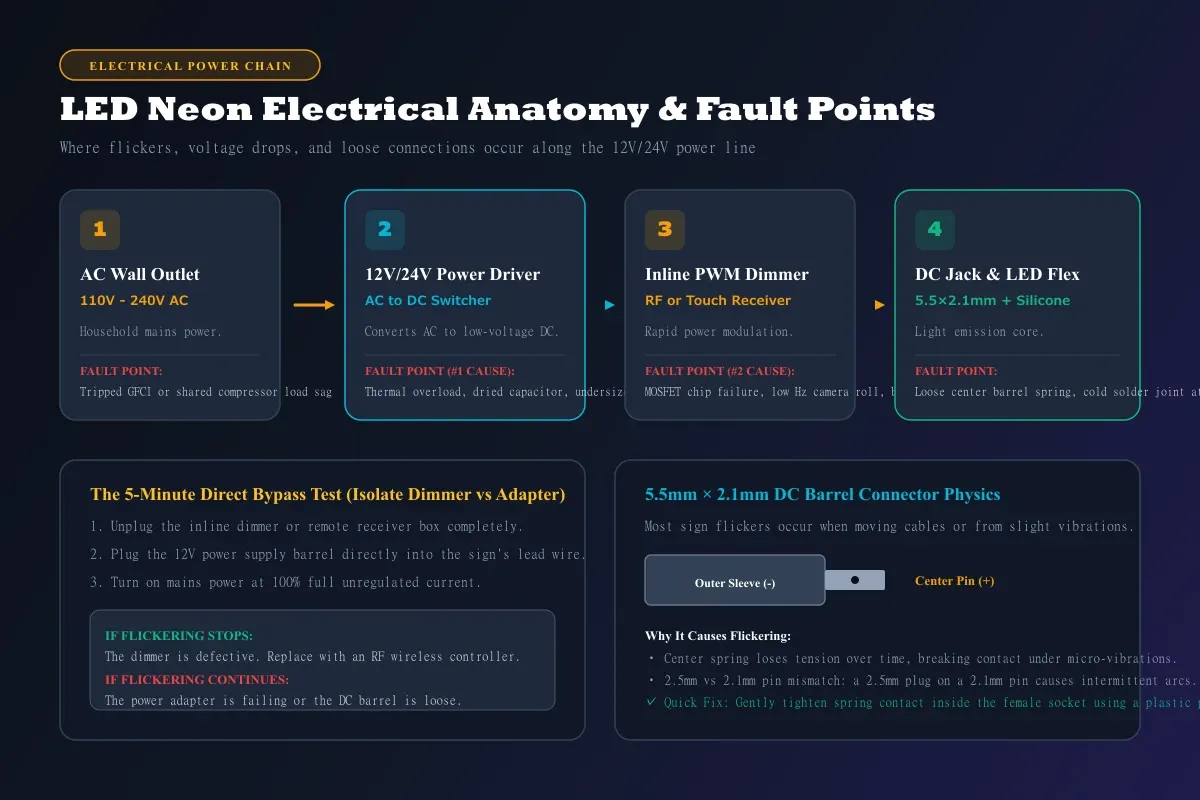
The 5-minute direct bypass test: isolating the fault
When an LED neon sign flickers, users almost always assume the illuminated silicone letters are broken. In our workshop experience, the LED flex itself is innocent more than 85% of the time. The failure almost always lives in the external control gear: the power adapter, the inline dimmer box, or the barrel connectors joining them.
The fastest way to pinpoint the exact failure point is the direct bypass test:
- Disconnect the Power Supply from the Wall: Unplug the 12V power adapter from the AC wall outlet completely before rearranging cables.
- Remove All Dimmers and Receivers: Unplug the inline touch dimmer, RF wireless remote receiver box, or inline switch located between the power supply and the sign. Set these accessories aside.
- Connect Power Directly to the Sign: Take the male 5.5×2.1mm DC barrel plug coming straight from the black power supply brick and insert it directly into the female DC pigtail jack emerging from the back of the neon sign.
- Plug Back into the Wall Outlet: Restore AC power. The sign will now receive full 100% unregulated direct current, completely bypassing all dimming circuitry.
If the sign lights up with a steady, 100% solid glow with zero flickering, your neon sign and power supply are perfectly healthy. The problem is a defective inline dimmer, a depleted remote battery, or a broken MOSFET transistor inside the controller.
If the sign continues to flicker or strobe even when plugged directly into the power brick, the dimmer is exonerated. The issue lies within the power supply brick, the DC barrel jack fitment, or an internal solder joint.
The 5 primary causes of flickering in LED neon signs
Once you have performed the bypass test, evaluate your sign against these five mechanical and electrical root causes:
1. Failing or undersized 12V/24V power adapter (thermal cycling)
The power adapter—the black plastic brick sitting between your wall outlet and your sign—is a switching-mode power supply (SMPS). It contains electrolytic capacitors, rectifying diodes, and pulse transformers that convert 110V/240V AC household current into steady 12V DC power.
When an adapter is cheap, aged, or undersized, it struggles under load:
- Cyclical Strobing After 2 to 5 Minutes: If your sign turns on normally, stays steady for a couple of minutes, and then begins to strobe on and off every few seconds, the power supply is overheating. Modern Class 2 power supplies include an internal thermal shutoff circuit. As the undersized brick overheats, the thermal switch trips, cutting power. Once the components cool for a few seconds, the switch resets, turning the sign back on, only to overheat again.
- Capacitor Failure: Over thousands of hours of operation, electrolytic capacitors inside the adapter dry out from ambient heat. When capacitors degrade, they can no longer smooth out direct current, passing a 50Hz or 60Hz ripple current to the sign that registers as a rapid, nauseating flicker.
- The 80% Workshop Rule: In professional signmaking, a power supply must never be loaded past 80% of its rated wattage capacity. If an LED sign draws 48 watts, a 60-watt power supply (12V 5A) is the bare minimum. Cheap online retailers frequently pair 50-watt signs with flimsy 36-watt (12V 3A) adapters to save shipping weight, guaranteeing premature failure. Read our detailed guide on can you leave a neon sign on all the time for continuous driver wattage benchmarks.
2. Loose or oxidized 5.5×2.1mm DC barrel connector
The standard connection joining modern LED signs to their power leads is a cylindrical 5.5mm outer diameter by 2.1mm inner pin DC barrel connector. This mechanical junction is one of the most frequent sources of intermittent flickering:
- Center Pin Tension Loss: Inside the female barrel socket is a small curved spring-metal leaf contact that presses against the male plug's center pin (+12V positive). Over time, plugging and unplugging—or minor wire tension from hanging—causes this leaf spring to flatten. Without firm mechanical pressure, electrical contact becomes micro-intermittent, causing the sign to flicker whenever footsteps shake the floor or doors close.
- The 2.1mm vs 2.5mm Pitfall: DC barrel plugs come in two visually identical sizes: 2.1mm center pin and 2.5mm center pin. If you accidentally plug a 2.5mm female plug onto a 2.1mm male pin, the connection will physically stay together, but the internal pin will float loosely inside the sleeve. The sign will flicker constantly or cut out entirely when touched.
- The Wiggle Check: With the sign turned on, hold the black plastic housing of the DC barrel plug and gently wiggle it sideways. If the flickering directly tracks your finger movements, the barrel connector has loose contacts or oxidation.
3. Inline PWM dimmer faults and low-setting pulsing
Most custom neon signs include an inline touch controller or a wireless radio-frequency (RF) remote receiver. These devices regulate brightness using Pulse Width Modulation (PWM). Rather than lowering voltage, PWM dims LEDs by switching them completely off and on hundreds of times per second. The ratio of "on" time to "off" time dictates perceived brightness:
- MOSFET Transistor Degradation: The miniature switching transistor inside the dimmer box operates under continuous thermal stress. When the transistor begins to break down, its switching frequency destabilizes, turning high-speed invisible modulation into an erratic, visible pulse.
- Extreme Low-End Strobe: Low-cost PWM dimmers operate at relatively low frequencies (200Hz to 400Hz). When you dim the sign down to its lowest 10% or 20% brightness setting, the "off" duration between pulses lengthens significantly. Human eyes—especially in peripheral vision—can perceive this modulation as subtle strobing. Turning the dimmer up to 50% or 100% immediately resolves this symptom.
- RF Interference and Memory Corruptions: Wireless controllers operating on 433MHz frequencies can pick up stray interference from nearby smart home devices, Wi-Fi routers, or microwave ovens. If the receiver module experiences signal distortion, it can flicker between programmed dynamic modes (flash, fade, strobe).
4. Cold solder joints and internal copper trace fractures
If only one word, letter, or section of your LED neon sign is flickering while the rest of the sign shines perfectly steady, the power supply and dimmer are functioning properly. The fault is located directly on the sign:
- Lead Wire Connection Pads: LED neon flex is built on continuous printed circuit boards (PCBs) encased in silicone. At the start of each cut section, two thin copper pads are hand-soldered to insulated copper lead wires. If the technician made a "cold solder joint"—where solder cooled before fully bonding to the copper—or if the lead wire was pulled during wall mounting, the solder joint can crack.
- Silicone Bending Stress: To form intricate lettering, signmakers bend silicone flex around sharp corners. If a tight curve placed excessive tension on the internal copper trace without proper strain relief, the micro-thin copper pathway can develop a hairline fracture. Thermal expansion causes the crack to open and close as the sign warms up, generating an intermittent flicker in that isolated letter.
- Water Ingress on Outdoor Signs: If an exterior sign lacks true IP67 silicone potting, rainwater or condensation can wick inside the end-caps, corroding the copper solder joints and creating resistive electrical shorts. Check our guide on can you put a neon sign outside for proper silicone injection weatherproofing standards.
5. Camera shutter conflicts: the "flicker" that isn't really there
One of the most common complaints sign workshops receive from wedding venues, cocktail bars, and content creators is: "My sign looks broken on video."
When you examine the sign with your naked eye, the light is 100% steady, solid, and serene. But the moment you point a smartphone or professional mirrorless camera at the sign, dark black rolling bars, harsh strobing, or violent pulsing appear on the screen:
- The Optical Explanation: This is not a hardware defect; it is an optical phenomenon called the stroboscopic effect or rolling shutter banding. Camera sensors capture video frame by frame (typically 24, 30, or 60 frames per second) using an electronic rolling shutter that scans lines from top to bottom.
- Frequency Collision: If your inline dimmer is modulating LED power at 400Hz, and your camera's electronic shutter is exposing at 1/120th of a second, the camera sensor records some horizontal lines while the LEDs are energized and other lines while the LEDs are dark. The result is dark horizontal bars rolling through the footage.
- How to Fix Video Flickering: Set your neon sign dimmer to 100% full brightness. At 100% duty cycle, the LEDs receive continuous DC power with zero PWM cycling, completely eliminating video banding. If the sign is too bright for the camera exposure, adjust your camera's shutter speed manually to match your regional electrical frequency (1/50s in Europe/UK or 1/60s in North America), or lower the camera's ISO.
| Component | Failure Symptom | Electrical Root Cause | Workshop Solution |
|---|---|---|---|
| 12V/24V Power Adapter | Whole sign cycles off/on every 3-5 minutes | Thermal overload switch tripping on undersized brick | Upgrade to adapter matching voltage with 20-30% more amp headroom |
| Power Adapter | Rapid 50Hz/60Hz continuous buzzing flicker | Dried electrolytic filtering capacitor leaking AC ripple | Replace power adapter brick; never attempt internal repair |
| DC Barrel Connector | Flickers when cable is moved or wall vibrates | Flattened center spring leaf or 2.5mm vs 2.1mm pin mismatch | Re-tension female spring with wooden toothpick or replace DC tail |
| Inline PWM Dimmer | Erratic strobing at all brightness levels | Blown MOSFET switching transistor or damaged RF receiver | Perform bypass test; replace controller with quality RF wireless unit |
| Inline PWM Dimmer | Subtle pulse visible only at lowest 10% setting | Normal low-frequency modulation (200-400Hz) perceived by eye | Increase dimmer brightness setting to 30% or higher |
| Camera / Phone Video | Dark rolling horizontal bars on screen only | PWM frequency beating against camera electronic shutter speed | Set dimmer to 100% brightness or adjust camera shutter to 1/60s |
| Silicone Neon Flex | Single letter flickers while other letters remain solid | Cracked cold solder joint or fractured internal copper trace | Resolder copper pad under silicone end-cap or claim workshop warranty |
| Glass Neon Transformer | Loud humming buzz accompanied by erratic flash | High-voltage arcing across GTO wire or dying iron-core coils | Unplug immediately; call a certified neon professional for replacement |
Why traditional glass neon signs flicker and buzz
If your sign is authentic glass neon, the troubleshooting protocol and physics are entirely different. Glass neon uses gas discharge tubes requiring 2,000 to 15,000 volts to ionize gas molecules into glowing plasma:
- Transformer Degradation: Traditional transformers (both heavy iron-core units and modern solid-state electronic power supplies) eventually break down. Internal insulation breakdown causes secondary voltage to drop below the threshold required to sustain ionization, causing the gas to extinguish, reignite, and flicker erratically.
- High-Voltage Arcing and GTO Wire Breakdown: High-voltage GTO cable connects the transformer to the glass tube electrodes. If the wire's silicone insulation chafes against metal framing or collects conductive dust, high-voltage electricity will arc across the air gap with an audible snapping sound and visible white-blue spark, causing the sign to flicker.
- Mercury Migration in Cold Temperatures: Glass signs filled with argon gas contain a small droplet of liquid mercury to produce bright blue, white, green, and pastel colors. In cold environments (such as unheated patios or winter storefronts), the mercury cannot vaporize properly. This creates "mercury starvation," causing the plasma to flicker, bead up, or look like swirling water inside the tube until the glass warms up.
- Gas Depletion from Micro-Cracks: Over 10 to 15 years, glass can develop microscopic hairline fractures around the electrode seals. As gas slowly escapes and atmospheric air leaks in, the tube requires higher strike voltage. Eventually, the transformer's built-in Secondary Ground Fault Circuit Interrupter (S-G взгля/GFI) trips, causing the sign to flash once upon startup and shut down completely.

Step-by-step fix guide for LED neon signs
Follow this sequence to resolve your flickering sign without spending unnecessary money:
Step 1: Verify the wall outlet and household circuit
Before purchasing replacement parts, confirm that the outlet is supplying clean, stable AC power:
- Test the Outlet: Unplug the sign's power adapter and plug a standard household lamp or phone charger into that exact same receptacle. If the lamp flickers or the charger disconnects, the fault lies within your building's wall outlet, a loose neutral wire, or a tripping GFCI breaker.
- Check for Shared High-Draw Appliances: LED switching power supplies are sensitive to voltage sag. If your sign is plugged into the same electrical circuit as an espresso machine, commercial ice maker, space heater, or mini-fridge, the heavy compressor startup draw will cause line voltage to drop momentarily, resulting in a visible dip or flicker. Move the sign to an isolated outlet on a different circuit breaker.
Step 2: Restore barrel plug spring tension
If your bypass test showed that the flicker tracks cable movement, the 5.5×2.1mm DC barrel connector has lost mechanical tension:
- Unplug Power Completely: Disconnect the adapter from the wall.
- Inspect the Female Jack: Look inside the center hole of the female barrel connector (the socket on the sign's wire). You will see a small curved metal spring tab on the inner sidewall.
- Re-tension the Spring: Using a thin wooden toothpick or plastic probe (never use conductive metal screwdrivers while powered), gently press behind the spring leaf toward the center hole by a fraction of a millimeter. This restores firm mechanical grip against the male pin.
- Clean Contacts: If the plug appears dull or oxidized, apply a drop of electrical contact cleaner (such as DeoxIT) to a cotton swab and clean the inner pin and outer sleeve.
Step 3: Replace the power adapter correctly (the matching formula)
If the power adapter is buzzing, running extremely hot to the touch, or failing the bypass test, it must be replaced. Selecting the wrong replacement brick can instantly destroy your sign:
- Rule 1: Voltage Must Match Exactly: Look at the sticker on the back of your original power brick under "OUTPUT." If it states `12V DC`, you must purchase a `12V DC` power supply. Never connect a 24V power supply to a 12V sign; the excessive voltage will instantly burn out the SMD LED chips and melt the silicone casing.
- Rule 2: Polarity Must Be Center-Positive: Verify the polarity diagram on the adapter label. In 99% of LED signs, the center pin is positive (`+`) and the outer cylindrical sleeve is negative (`-`). Connecting a center-negative supply will cause the sign to remain dark or trip the power supply's reverse-polarity protection.
- Rule 3: Amperage (Watts) Can Be Higher, Never Lower: If your old adapter was rated `12V 3A` (36 watts) and failed from overheating, upgrade to a `12V 5A` (60 watts) or `12V 6A` (72 watts) power supply. The sign will only draw the amperage it requires, while the higher-rated power supply will operate comfortably cool, extending its lifespan for years. Learn more about illuminated signage engineering in our analysis of how long do LED neon signs actually last.
When to replace vs upgrade your illuminated sign
A flickering neon sign is rarely a complete catastrophe. In nine out of ten cases, executing the 5-minute bypass test, tightening a relaxed DC barrel contact, or investing twenty dollars in a higher-wattage UL-listed 12V power supply restores flawless illumination for years to come.
However, if your sign has suffered internal moisture damage, extensive silicone yellowing, or multiple broken solder joints across intricate script lettering, repair costs can quickly exceed the value of the sign. When that happens, upgrading to a commercial-grade sign built with optical-grade silicone, authentic UV-cast acrylic backboards, and certified Class 2 power components is the most cost-effective path.
Explore our custom signage workshop to design a replacement that lasts:
- Bespoke LED Neon Brand Signs: View our made-to-order custom business logo signs engineered with high-density LEDs, reinforced strain relief, and premium RF controllers.
- Permanent Dimensional Storefront Letters: If your commercial space requires heavy-duty architectural visibility, explore our channel letter signs guide and backlit signage vs light box signs comparison to evaluate halo-backlit stainless steel and ultra-thin lightboxes.
- Submit Your Logo for a Free Engineering Mockup: Send your vector artwork, dimensions, and mounting requirements to our engineering team at The Glownique for a complimentary digital mockup and exact component specification.
Frequently asked questions
- Can a flickering neon sign cause a fire?
- Low-voltage 12V LED neon signs carry very low fire risk because Class 2 power adapters feature built-in short-circuit and thermal overload cut-offs that shut down power before wire insulation can ignite. However, a loose DC barrel connection that sparks or gets hot to the touch can melt plastic housings over time, so it should be fixed promptly. Conversely, traditional glass neon signs operating at 2,000 to 15,000 volts pose real fire and electrical shock hazards if high-voltage GTO cables are arcing against walls or framing; turn glass signs off immediately if arcing or smoke is detected.
- Why does my neon sign flicker only when I dim it?
- This is almost always caused by low-frequency Pulse Width Modulation (PWM) inside budget inline dimmers. Cheap controllers modulate current at relatively low frequencies (200Hz to 400Hz). When set to low brightness (10% to 20%), the "off" interval between pulses lengthens enough for human retinas to register the rapid pulsing. Increasing brightness to 30% or replacing the dimmer with a high-frequency (1,000Hz+) RF remote controller eliminates the visible pulse.
- Why does my neon sign turn on for a few minutes and then start flashing?
- This is the classic signature of an overheating power supply adapter. When an adapter is undersized for the total length of LED neon flex, its internal electronic components heat up rapidly. Once internal temperatures exceed safe thresholds (usually around 70°C to 80°C), an internal thermal overload switch cuts power to protect against fire. After shutting down, the components cool off within a few seconds, the switch resets, and the sign relights—initiating a continuous, rhythmic cycle of overheating and shutting down. Upgrading to a power adapter with 20% to 30% higher amperage headroom solves the issue permanently.
- How do I know if my neon sign transformer is dying?
- For glass neon signs, a dying transformer exhibits distinct symptoms: an audible, loud 60Hz buzzing or humming that vibrates through the wall, sections of the glass tube flickering or glowing with dull orange/purple plasma, or the sign flashing on for half a second before immediately clicking off (the internal secondary ground fault interrupter tripping). For LED signs, a dying power brick will produce high-pitched capacitor coil whine, emit excessive heat, or output unstable voltage below 11.0V when tested with a digital multimeter.
- Can I fix a broken internal solder joint on an LED neon sign myself?
- If you have basic soldering tools and soldering experience, yes. Locate the flickering segment, carefully slice open the silicone end-cap or peel back the rear backing with an X-Acto knife to expose the two copper cut pads, and inspect the solder joints. Touch a fine-tipped soldering iron (heated to around 350°C) with a dab of 60/40 rosin-core solder to reflow the cracked joint onto the wire lead. Once verified, reseal the connection with neutral-cure clear electronic silicone sealant. If the sign is within its warranty period, contact the manufacturer instead of opening the silicone casing, as DIY repairs typically void commercial warranties.
Sources
- UL 8750 Standard for Light Emitting Diode (LED) Equipment in Lighting Products — Underwriters Laboratories (accessed 28 October 2026)
- NEC Article 600: Electric Signs and Outline Lighting Class 2 Power Limitations — National Fire Protection Association (NFPA) (accessed 28 October 2026)
- IEEE 1789-2015: Recommended Practices for Modulating Current in High-Brightness LEDs for Mitigating Health Risks and Video Flicker — IEEE Standards Association (accessed 28 October 2026)
- UL 1310 Standard for Class 2 Power Units and Thermal Overload Protection — Underwriters Laboratories (accessed 28 October 2026)
- LED Power Supply Thermal Management and Derating Guidelines — Sign Research Foundation (accessed 28 October 2026)
Turn the idea into a sign
Send us your logo, words or a rough sketch and we'll come back with a free digital mockup and a quote for your exact size — before anything is built.